Manual & Automatic Deployments with Cloudoor Deploy
Your teams are on deck, and your environments are running at full speed.
Finally, it's time to deploy your applications.
Cloudoor built several advanced deployment strategies to let you deploy with all confidence in production, with templatized frameworks.
This section will show you how to use Cloudoor to manage the deployment of your applications.
We will show you how to scale up/down applications, manually deploy new versions (continuous delivery), and detect and auto-deploy new versions pushed on your docker registry (continuous deployment).
Prerequisites
- door installed on your computer
- A Cloudoor cluster (go back to the QuickStart section to see how to deploy one)
- You followed the project and environment creation.
Before Starting
You must have created a project with a few environments at this point.
Let's make sure you can deploy with docker first.
Create and push an image to your docker registry
First, clone the version-printer repo
Then, build and push version 1.0.0 of Cloudoor to your docker registry.
git checkout 1.0.0
docker build . -t <your username>/version-printer:1.0.0
docker push <your username>/version-printer:1.0.0
Finally, build and push version 2.0.0 of Cloudoor to your docker registry.
git checkout 2.0.0
docker build . -t <your username>/version-printer:2.0.0
docker push <your username>/version-printer:2.0.0
Connect to your environment
This command allows you to get a kubeconfig to access your environment.
Now, you can apply kubectl commands.
Deploy the version-printer application to your environment
Port-forward and check if the application responds correctly
First, open a new terminal and run the following command
On another terminal, run the following command to test if the application responds correctly:
Result example:A CD operator on the Cloudoor data-plane monitors Kubernetes objects such as deployments, StatefulSets, DaemonSets, Services, and Ingress.
It's, therefore, possible to retrieve the list of all workloads (applications) currently in an environment. In addition, the operator also monitors the docker registry to detect new versions of applications.
You can use CD functionality from Cloudoor's U.I. or door.
For example, we can get the list of workloads deployed in a namespace with the following command.
Scaling your applications
You can scale up/down an application directly from Cloudoor without accessing the cluster API-server where you deployed the application.
Instead, you can do it through Cloudoor's UI, or Cloudoor's CLI, door.
Scaling your applications
- Go to Deploy

On this board, you will find all the applications for your project. You can filter them according to project, environment or strategy. Simply click the one you wish to edit.
- You'll be taken to the info page of your application where you can see all information about your application at a glance. Click "Update"

-
Define the number of replicas for your app.
-
Press Update
You can get the list of workloads deployed in a namespace with the following command:
It should return a list in this format:
| NAME | STRATEGY | REPLICAS | IMAGE | AUTO-DEPLOY | LIVE | STAGING | STAGING-TRAFFIC | HEADERS |
|---|---|---|---|---|---|---|---|---|
| workload Name | canary | replicas Number | username/workloadName | true/false | V1.0.0 | 0 |
You can increase or decrease the number of replicas of the version-printer application by adjusting the number of replicas you want with the following command:
Yay, you scaled your application! 💪
Continuous Delivery with Cloudoor
Delivery deployment is a manual method where you will have to manually select the application's version to release to the market.
From Cloudoor's API, it is easy to update the version of an application manually. Furthermore, it prevents you from detecting the Kubernetes cluster on which you deployed the application to retrieve a kubeconfig, allowing us to access it and type kubectl commands to update the app version.
You can do it from the Cloudoor user interface or the command line with door.
Info
Continuous delivery is the default strategy applied for each onboarded application.
You can apply this strategy to deployment, Statefulset, and Deamonset applications.
Continuous Delivery
a) Go to Deploy
On this board, you will find all the applications for your project. You can filter them according to project, environment or strategy. Simply click the one you wish to edit.
You'll be taken to the info page of your application where you can see all information about your application at a glance. Click "Update"
b) Choose the Default Strategy for your application.
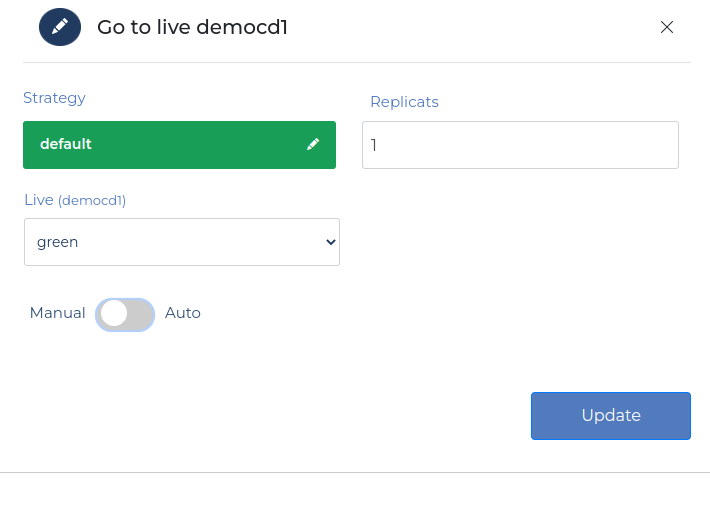 1. Scale up or down your application if needed by changing the Replicas number.
-
Select the Default strategy.
-
Select the version you want to deploy.
-
Don't push the Auto Deploy button.
-
Press Update.
You can find below the command to choose the version of the version-printer to apply to your workload:
You can verify if the deployment is effective with this command:
And finally, you can see that the live version of the version-printer app with:
Yay, you've deployed your application! 🥳
If you deploy a new image, Cloudoor will identify it.
To deploy a new image, select the new version that should automatically appear. After that, you will have to re-edit your application.
Automatic strategy for Continuous Deployment
Continuous deployment is an automatic method where Cloudoor will deploy each new onboarded version of your applications without your intervention.
Cloudoor's CD operator can monitor your docker registry and detect any new versions of your applications. It is possible to activate the auto-deployment functionality so that each time a new version of your application is pushed on your docker registry, Cloudoor will automatically deploy it. We can also apply filters on the name of the versions to be deployed.
You can do it through Cloudoor's UI or DOOR.
Info
You can apply this strategy to deployment, statefulset, and deamonset applications.
Continuous Delivery
a) Go to Deploy On this board, you will find all the applications for your project. You can filter them according to project, environment or strategy. Simply click the one you wish to edit.
You'll be taken to the info page of your application where you can see all information about your application at a glance. Click "Update"
b) Let's activate auto-deployment
1. Scale up or down your application following your needs.
-
Select the Default strategy.
-
Select the version you want to deploy.
-
Push the Auto deploy button.
-
Press Update.
Your application will be automatically deployed as soon as a new version is added. So if you want to change the strategy for this one or scale your application, you will have to re-edit your application.
c) Check your App Info Page.
You will find your application deployed according to the chosen strategies, in the example « Default.»
Run the following command to activate the auto-deploy functionality for the version-printer app:
door deploy workload version-printer --auto-deploy=true --project <projectName> --env <environmentName>
By assigning the actual value to auto-deploy, you allow the version-printer to point to the last created version of the Nginx image. Each time a new version is made, the app will automatically be deployed.
By typing the following "get workload" command, you'll notice that an auto-deploy variable now appears:

Let’s build and push version 3.0.0 to your docker registry.
git checkout 3.0.0
docker build . -t <your username>/version-printer:3.0.0
docker push <your username>/version-printer:3.0.0
After this, Cloudoor will automatically deploy version 3.0.0.
To verify if it worked, you can use the "get workload" command again:

Then, we can test with the following command.
Result exampleRun the following command to disable auto-deploy