Set Up and use of Cloudoor IAM
Welcome to your first steps on Cloudoor ! In this section, we'll show you how to invite users, assign them roles, and delete them if necessary.

Roles in Cloudoor
In Cloudoor, roles are based on the prioritization of personas common to all Kubernetes use cases on two layer of your enterprise, organization level (IAM) and project level (RBCA).
| Role Name | Level | Role Description |
|---|---|---|
| Super-Admin | Organization | The super-Admins configure the interface. They can integrate all users via IAM, clusters via the Hub, and define tagging and quota policies for the organization. |
| Project Owner | Organization | The Project Owners become administrators of their projects They can create and administer a project, ask for resources (CPU, Memory, Storage), add team members to the project, link environments across multi-cloud Kubernetes clusters |
| Project Owner+ | Organization | Same as Project Owners except one thing. The Project Owners + are self-provisioned; they do not need validation from the Validator. |
| Validators | Organization | They Validate Resources requests. The Validators receive the resource requests and decide whether or not to accept them. In case of refusal, the owner project must reapply. |
| Project Admins | Project | They are the project Owners Manage environments, Resources, clusters, day-to-day deployments |
| Developers | Project | They deliver applications. Set up environments and Deploy Applications |
| Viewers | Project | They monitor results. They can view and monitor KPI thanks to the dashboard project |
Cloudoor Members Set Up Using Cloudoor UI
Invite Members and Assign Roles
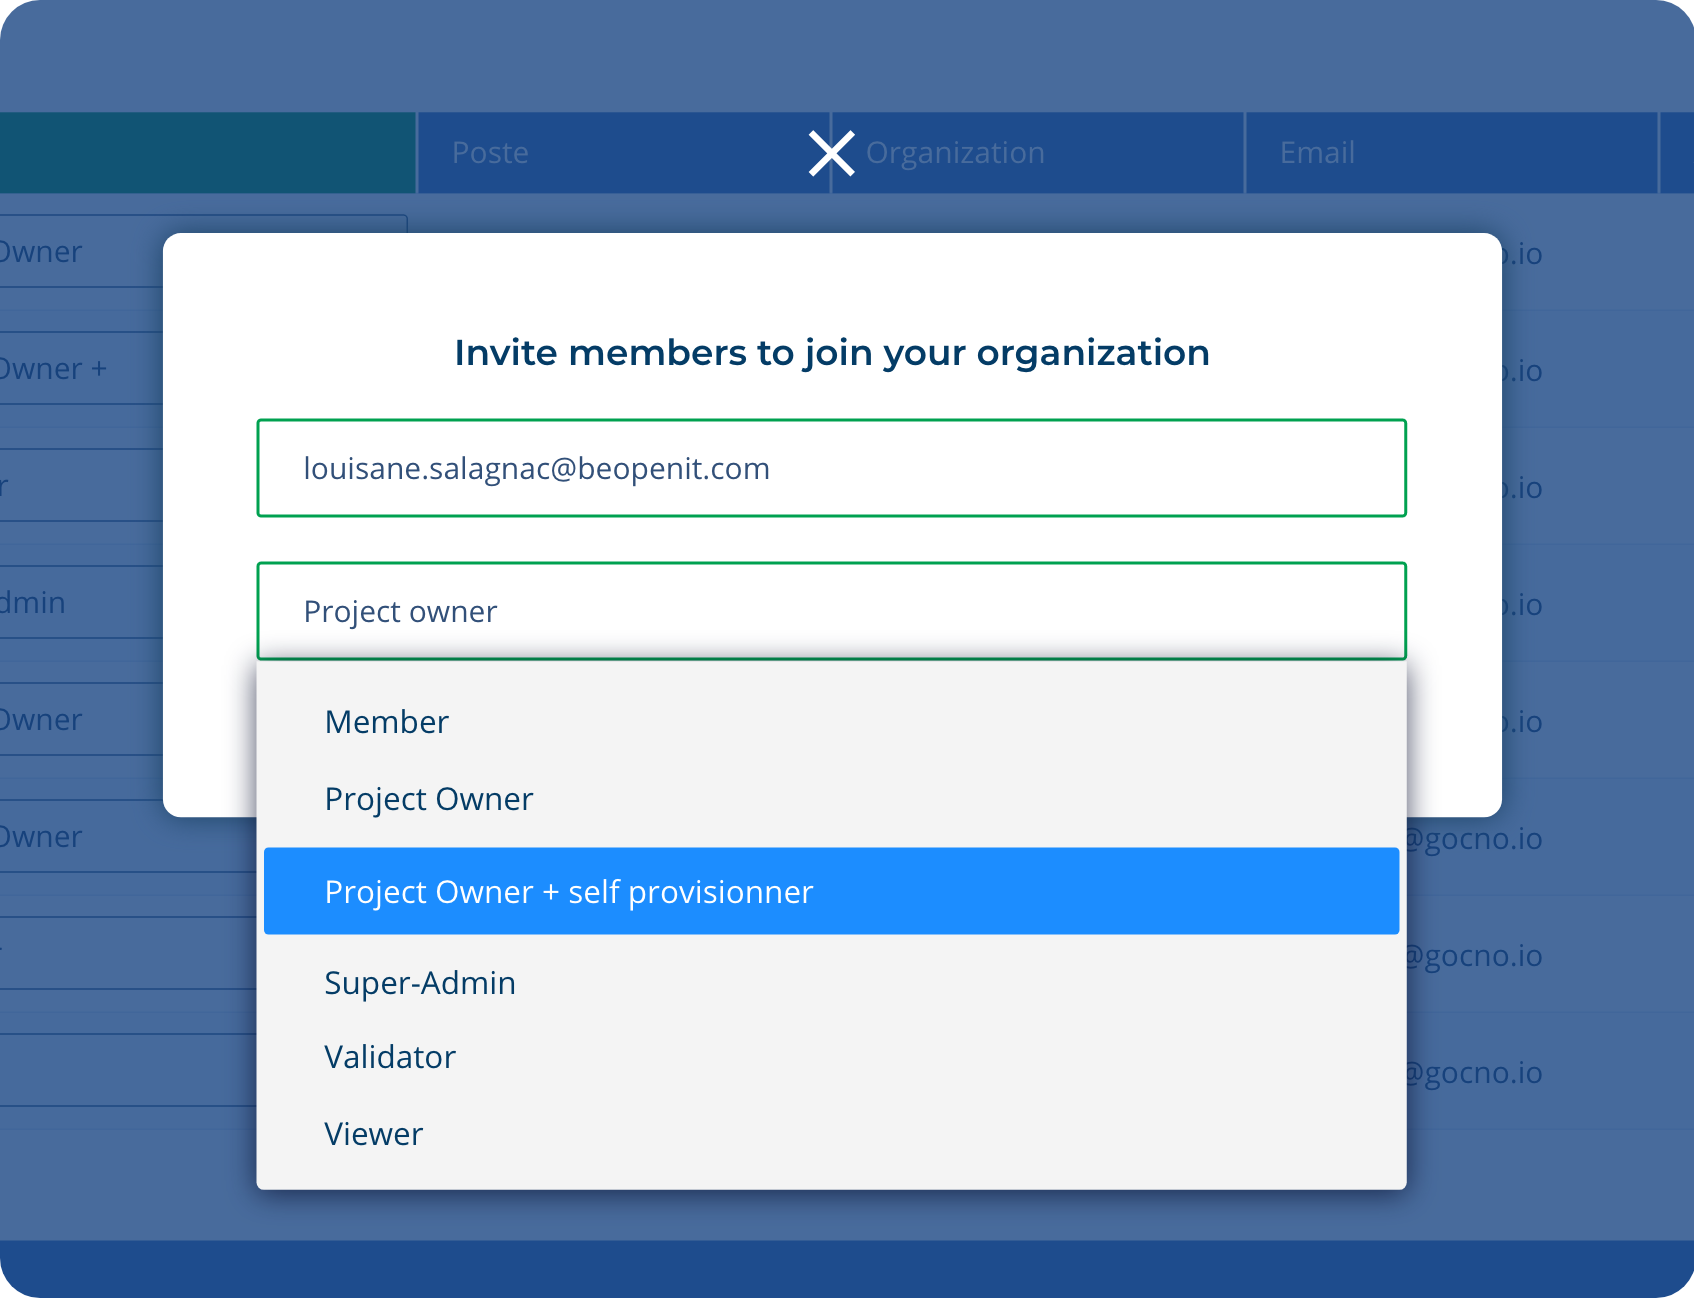
- Let’s click on “invite member” button in the navigation bar.
- Fill the new member's email address.
- Click on “Add”
The user will be sent an email with a link for creating their password. After they're done. They can login to the Cloudoor UI with their username and password. You can click the Members Section and you can see your newly added user if they've accepted the invitation link.
Managing Members Access
To manage your members' access, go to the "Members" dashboard in the nav bar. This function groups all active members of your organization. Here you can:
- Change a member's role in the field indicated in the column next to their name.
- Delete a member by pressing the delete cross and confirming deletion in the dialog box that appears.
And you're done.
Cloudoor Members Set Up Using DOORCLI
Prerequisites:
Connect to the Cloudoor command line to use a command in this tutorial.
Creating IAM Users
door adm create user --firstname james --lastname james --email james@gmail.com --username james --department devops
NB: The username and email flags are required to create a user.
The user will automatically be assigned a member role.
Listing IAM Users
You can list all users or a specific user.
- To list a specific user:
- To list all users:
Assigning and Droping Roles to IAM Users
Before assigning a role, you should verify that the user is already registered. You can assign a new role for a user or modify an existing role from the user.
- Assigning A Role:
Assign a super-admin role to james
- Dropping A Role.
Before deleting a role, make sure there is a user with this role. Drop James's super-admin role.
Updating IAM Users
You can update the first name, last name, and the department of the user. Before updating the user, be sure that it exists by listing the users. Now, let’s modify the first name James to Mody.
NB: The username is required and can not be changed.
Deleting a IAM User
Before deleting a user, you must verify if the user exists. Then, delete the user james by specifying his username.
Creating an IAM Group
To create a new group for example admin group, you use the door command:
Deleting an IAM Group
To delete the admin group use:
Note: You can only delete empty groups, so you'll have to delete every user in the group before deleting the groupListing IAM Groups and Users
Listing Groups and All user-member contained in the Group:
To get all groups use:
To get a single group admin for example use:
Assigning Roles to IAM Group
To add super_admin role to the admin group use:
Example:
Deleting Roles from IAM Groups
Delete super_admin role from the admin group use:
Example:
Adding Users to IAM Group
To add one or more users to a group use:
Example: To add user james to the group admin use:Deleting Users from IAM Groups
To delete a user from a group use:
To delete user james to the group admin use:
Learn More
- Continue configurations : Cloud Providers Management
- Create and manage projects: Projects
- Add and manage clusters: Clusters